Monday 30 April 2012

Evaluation

During this evaluation, my strengths and weaknesses throughout the 3D Character Animation module will be addressed, along with any improvements which can be learnt from and carried forward into similar projects in the future.

My Strengths

During this module, I really improved on my research and modelling skills. In order to create a successful villain character, research had to be undertaken into how existing villains are portrayed, how body language impacts on the way a person comes across and which muscles are used in the face to give expressions and emotions. This then had to be applied to a 3D Studio Max model which I felt I accomplished well.

I ensured that any information I discovered and any new skills I learnt were placed on my blog as evidence of my progress, and to use in the future as a reference in case I struggled with applying the tutorials in class to my own model. However because of this, I did not run into many problems, especially not with the modelling stages.

Because I am quite familiar with 3D Studio Max due to previous modules, it meant that I did not have to spend any extra time learning how to use the software, just learning new skills and methods of improving previously obtained skills, such as skinning and boning.

My Weaknesses
My main weakness was that I spent too much time trying to fix issues with the animation, which put me behind schedule. My tutor was also unsure why my penguin model would not animate with bones, biped or CAT systems. This setback meant that previous work (design work and modelling work) had to be scrapped and an alternative had to be found, which merely involved facial expressions and a monologue.

Due to this setback, it meant that less time could be spent on the alternative so the end product was not as good as I had originally hoped. However, I hope this is a lesson which will be learnt from in the future, as not much time was allowed in case I had trouble with the animation process.

Time management
Considering the major issue during this module, I believe that I managed to achieve as much as I possibly could using the time and resources available to me.

Improvements
  • More time will be allocated to the project in case anything untoward goes wrong in the future.
  • If any issues arise that cannot be fixed within a certain amount of time, more work should be completed in the mean time until a fix or a work around is found.

Animating My Penguin - Using Autokey, Morpher, Rotate/Move Tools and Super Spray Particles

Moving back to 3D Studio Max, I used the morpher tutorial documented previously to help me apply movement to my penguin's facial features. Firstly, I made copies of the penguins eyes, eyebrows and beak and alligned them next to the model. When I come to render the animation properly, I will hide the other features. Figure 1 shows an example of the different faces used in the animation clip.


Figure 1: Different faces ready to morph to the parent
Once the morpher was applied to the parent, I used the "Select From Scene" button which allowed me to choose what I would like to morph with the current target. Once these were listed, it was possible to see the transitions using the scrollbar.

Next, I had to import my WAV monologue into 3D Studio Max, like in the tutorial. Figure 2 shows the track editor with the sound file displayed on it:


Figure 2: Track Editor in 3D Studio Max
The trickiest and possibly most annoying and frustrating part of this project now is to lip sync the penguin's beak with the sound file so it looks like the penguin is speaking the words. Auto Key was used during this process and Figure 3 shows the timeline with the keyframes part way through the task.

Figure 3: Keyframes shown on the animation timeline.

The following figures show the different movements and expressions achieved after using the morpher tool.

Figure 4: Beak open


Figure 5: Beak closed
Figure 6: Penguin becomes angry at the end of the clip. Steam created using super spray particle emitters, wind emitters and drag. 
Figure 7: Image of the penguin model in the inspector view before it was rendered to show the positions of the particle emitters and the wind/drag.
Music was added to the video as an intro and an outro to add more to the theme of villainicity. The choice in music was a royalty free operatic version of the popular nursery rhyme, "Pop Goes The Weasel". The reason for this choice is that this is a children's villain so children would be able to recognise the soundtrack, whilst it brings something eerie and new to what already exists. Various existing villains (looking at previous research) have "theme songs" like Cruella Devil. 

Unfortunately, the finished video is too large to upload to blogger, see the submitted CD to see the final result! 
....................................................................................................................................................................
References

MacLeod, K., 2012. Pop Goes The Weasel. [music download online] Available at: <http://incompetech.com/m/c/royalty-free/index.html?genre=horror> [Last Accessed: 03/05/2012]

Khan, A., 2010. Creating Realistic Cigarette Smoke in 3D Studio Max. [online] Available at:
<http://www.republicofcode.com/tutorials/3ds/cigarette/> [Last Accessed: 03/05/2012]

Into Audacity!

The next step was to move into Audacity and make some changes to the audio recorded. Typically, I was looking at removing any long pauses, any stutters and any background noise.

On the whole, I believe I did a good job editing the sound, however there were some insidences of popping when the male voice actor got a little too carried away with the louyder voices. This could be due to the quality of the microphone used to record the sound, but due to time constraints very little could be done to avoid it completely.

The figure below shows a sample screenshot of me at work, adjusting the sound clip: 

Figure showing the audio clip being edited in Audacity software.

Due to time constraints, I had to reduce the sound track from 62 seconds to 43. This will allow me to concentrate more on the villain side of my character and morphing the eyes and eyebrows too.

Friday 27 April 2012

Penguin Monologue

With the help of a very handy website about monologues, I have produced a script which a willing male volunteer will perform and send to me as a voice track:

Penguin Monologue

*performed with an attitude*
Oi you... Yes you looking at me through your pc screen... What do you think you’re looking at? Huh?

Hey, just because I’m not your average looking penguin... I didn’t ask for this to happen to me did I?

Well just for your information... I hate this world. I hate everything these humans are doing to this planet... everything this planet stands for... and I will do everything in my power to make you realise how unhappy other penguins make me... waddling around as if all their life consists of is swimming and fish! I like to hang around their igloos, causing trouble and making their lives a misery... I mean my life is, so why shouldn’t I make them feel the same way as me?...

I mean it... I will do ANYTHING to get what I want...

*eyes go big and really red*

You don’t believe me do you?! DO YOU!?!

*background turns red and steam starts pouring out of his ears*

... Now do you realise?

*fade to credits*

...........................................................................................................................................................................
References

HubPages, 2012. How To Write Effective Monologues. [online] Available at: http://sentinel5344.hubpages.com/hub/How_to_write_effective_monologues
Last Accessed: 27/04/2012

Tuesday 20 March 2012

Issues with Animating

During the animation process of my penguin, I have had no end of trouble getting it to move correctly. After trying the CAT systems for my penguin, I tried using bones and a biped. However for some reason, the skin would not work correctly.I asked various other people for help and advice, including my tutor who was just as confused as to why it wasn't working as I was.

In order to combat this major problem and save the project, I have had to create a monologue for my penguin and show his emotion and villainicity using facial expressions. The CAT has been left within the penguin so that his flippers remain down instead of sideways.

I am absolutely gutted, however I hope to still produce an effective project. Because I have produced adequate paperwork, if a solution was found at some point in the future the project could be picked up from where it was left off.

Thursday 15 March 2012

Sounds and Music

This is an object table containing the music and sound effects that are going to be used in the final animation:

Objects Created For Animation

Here are the additional objects required in order to create the final animation. These will not be marked upon, therefore only images will be included:

Background scene

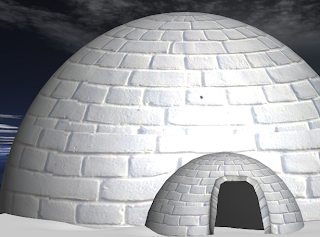
Igloo where the penguins are asleep

"Good" penguin which goes to approach the villain after being woken up

Potential animation scene

Thursday 8 March 2012

Muscles and How They Control Facial Expressions

When a person moves their face, whether it's to blink, to smile, to laugh, to frown, to cry etc. a variety of different muscles are used and work together in order to show these expressions visually.  Figure 1 shows various facial expressions by the same person:

Figure 1 shows many facial emotions that a person can make using various muscles
Without these muscles, every emotion would look exactly the same. Baring this in mind, you wouldn't be able to tell when someone was happy, or sad. Wouldn't life be boring? Figure 2 shows a human face with every major facial muscle labelled.

Figure 2 shows human face with all muscles labelled
In order for a mouth to open and shut - the Buccinator, the Temporalis, the Masseter and the Platysma muscles are used, along with the lower jaw bone (Kidport, 2012).

The Orbicularis Oris muscle is responsible for lip movement, especially when talking, smiling, eating and when you are sad (Kidport, 2012).

The Orbicularis Oculi is responsible for eye movements such as opening and closing the eye, widening the eye and squinting. This muscle also contracts when you smile and your eyes turn up in the corners. Working in conjunction with the Occipitofrontalis, these muscles move the eyebrows too (Kidport, 2012).

In order to smile, 12 muscles in the face move, and in order to frown 11 muscles move (Wisegeek, 2012).

Cultural Differences

According to a study by University of Glasgow published and documented on Cell Press (2009), people from different cultures read facial expressions differently. Typically, westeners tend to look at the eyes and the mouth equally, however easterners tend to focus more on the eyes and disregard the lips somewhat. This meant that during the investigation, easterners made more mistakes when expressions in the eyes looked similar compared to westerners.

This is interesting because previously, I discovered how different cultures mistook hand signals and misread body language as it varies from place to place. Now I have learnt that expressions play a very important role in how a character comes across.

In Terms Of The Project

Although penguins will have a different facial and muscle structure to a human, this research will still be applicable in my project because my penguin will be personified and will have human behaviours so that the target audience can relate easier. 

The penguin will be opening and closing its beak in order to speak, he will blink, his eyes will widen and glow red and his eyebrows will wiggle and move up and down in an angry manner.  

.................................................................................................................................................................
References

Kidport, 2012. Image of Head and Face Muscles. [online] Available at: <http://www.kidport.com/reflib/science/HumanBody/MuscularSystem/images/FaceMuscles.jpg>
Last Accessed: 28/04/2012

Kidport, 2012. Head and Face Muscles. [online] Available at: 
http://www.kidport.com/reflib/science/HumanBody/MuscularSystem/HeadFaceMuscles.htm
Last Accessed: 28/04/2012

Cell Press. "Facial Expressions Show Language Barriers, Too." ScienceDaily, 13 Aug. 2009. Web. 29 Apr. 2012.
ScienceDaily, 2012. Image showing different facial expressions. [online] Available at:
<http://images.sciencedaily.com/2009/08/090813142131-large.jpg>
Last Accessed: 28/04/2012

Wisegeek, 2012. How Many Muscles Are Used To Smile. [online] Available at: <http://www.wisegeek.com/how-many-muscles-are-used-to-smile.htm>
Last Accessed: 28/04/2012

Skinning and Boning My Villain

Now that the penguin model has been finished, I can concentrate on the next step which is to skin and bone my model. In one of my previous posts, I stated that I will be creating my own CAT Parent because none of the existing CAT Parents are suitable for my mesh. 

The first step was to make the penguin model see through to make it easier to position the bones. Then, I created a CAT rig and placed it underneath the penguin model. The position is important because when the structure of the CAT is built, it will be built around the cente of the triangle.


After creating a hip bone, similarly to the tutorial, the bones were constructed and positioned inside the mesh. It did not matter if the bones slightly overlapped the mesh as they will be hidden in the final render. The image below shows the finished bone structure:


Extra care and attention was paid to the feet of the penguin because they are quite thin with a fair amount of detail:


Now that the boning was complete, it was time to use the Skin modifier. However, this proved useless because as I tried to move the bones, the mesh would nit move at all, even though the envelopes were displaying correctly. When I asked my tutor what to do, she suggested using the Physique modifer instead as it is more effective and reliable. Once the Physique was applied to the hub bone, the mesh started to move. However, there were issues where parts of the penguin that were supposed to move did not move naturally so I began editing the envelopes. After doing this, it was possible to move the bones and the mesh moved correctly with it. 


The image below shows my penguin with both of his flippers down by his side:


My penguin rendered with his flippers moved downwards:

Friday 2 March 2012

PowerPoint Presentation and Feedback

It is the halfway point in the project and that meant that it was time to create a presentation to introduce my character to the rest of the class. After the presentation, I received both positive and negative feedback which I am going to reflect upon and modify my design.

Slide 1

Slide 2

Slide 3

Slide 4
Feedback
  • Good idea. 
  • Gone into sufficient depth of detail with the character analysis.
  • Penguin model is coming along well, just needs to be boned before the animation can go ahead.
  • Note that any extra parts to the animation will not obtain any extra marks (for example, the igloo and the surrounding areas).
  • Make sure that my idea will fit within the 30 second - 1 minute time length.
Reflection Upon Feedback
I am really looking forward to beginning the animation stages of my penguin. All I need to do now is create the remaining components for the scene I have chosen to develop and animate. The next blog post (which will be brief) will show my environment and the extra models created within it.

Tuesday 28 February 2012

Adding the Material

In order to make the penguin model look realistic, materials have to be appleid and adjusted. The first image (Figure 1) shows my penguin before I began applying the materials, which were either hand made by myself using Adobe Photoshop or were sourced from the Internet (references to follow).

Figure 1: Penguin villain with no bodily materials


Material channels were used to allow multiple materials to be attached to one object. However, what I have had issues with is the bandaging material on the top of the penguins head and the bandages on the wing. The wings are supposed to have vertical lines however they are horizontal and stretched, which look unrealistic. I have tried rotating the material and using different shaped plans such as Cylindrical, Spherical, Box and Plane however this has not made any difference (See Figure 2).
Figure 2: Penguin villain with materials attached

If anyone knows how to fix this, could you please comment below?
Thanks!

Thursday 23 February 2012

Character Facial Features

The following blog post will describe how each of the individual facial features were created. The creation of features was incredibly important because ultimately, they will be what portray my villain's emotions and will accompany gestures.

Eyebrows

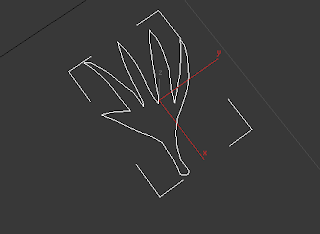
The first step was to create a plan for the eyebrows. Due to the amount of detail in them, it meant that it would be difficult to create a base using primitive shapes or by beginning to model straight away with just a few sketches to look at. For accuracy, a guide was created. I used Adobe Illustrator software and used the pen tool to trace over an image of my penguin, saved as an older version of Illustrator file and then imported that into 3D Studio Max. Although I used this method, it is also possible to import the image onto a plane object, use UVW Map to position the eyebrow and then use the line tool to trace. Figure 1 shows the eyebrow traced in Adobe Illustrator whilst figure 2 shows the guide once it has been imported into 3D Studio Max.
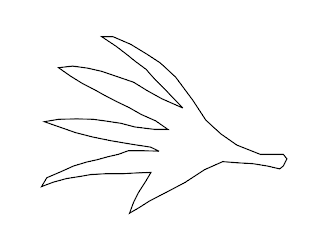
Figure 1: Traced eyebrow guide in Adobe Illustrator

Figure 2: Eyebrow guide imported into 3D Studio Max
After increasing the size of the eyebrow guide to make it easier to model, I converted the guide to an editable poly and used the Extrude tool to create the eyebrow shape:
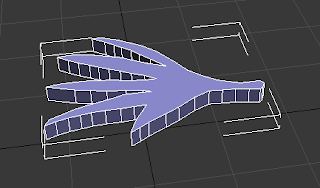
Figure 3: Eyebrow shape after it has been extruded
In order to create a smooth shape, TurboSmooth would need to be used. However one of the issues I came across was that where the eyebrow was just one large polygon on top and underneath, the smooth modifier would give an undesirable result which was quite messy and unrealistic. In order to find my way around this, I used the cut tool to divide the large polygons up into smaller, more manageable quads. The image below (Figure 4) shows the result after completing this on just one side. As you can see, the issues with the smooth still remain so both sides had to be divided.
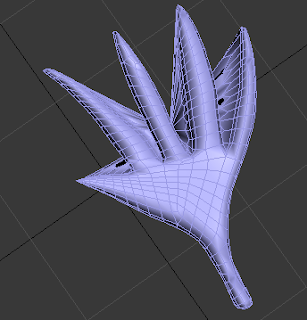
Figure 4: Issues with the TurboSmooth modifier
However, once both large polygons were seperated into small quads, there were no more issues as you can see from Fingure 5, displaying the finished eyebrow.
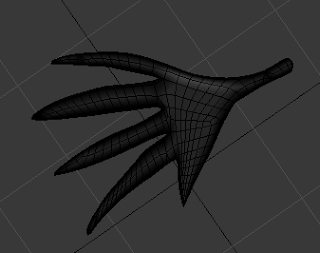
Figure 5: Finished eyebrow, with TurboSmooth turned on
The eyebrow was then copied (ensuring that it was a copy and not an incidence so that they can be modified independantly of each other) rotated, and then positioned onto the penguin model. The image below (Figure 6) shows the eyebrows in position.
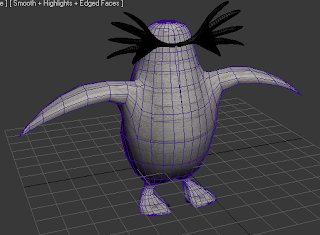
Figure 6: Eyebrows copied and applied to the penguin model

Eyes

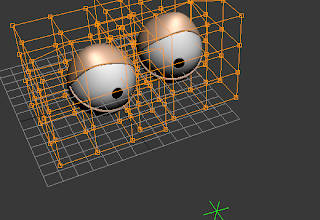
During week one, eyes were discussed and as a class, we followed a tutorial whereby we created and animated a set of eyes (see Figures 7 and 8). I incorporated these into my design, however I removed the animation element for now. This will be replaced when I begin the animation process of my entire penguin model.
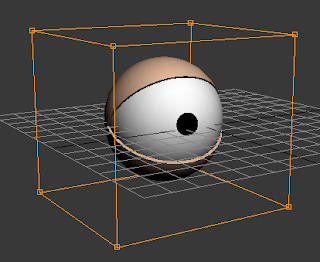
Figure 7: The makings of my eyes in tutorial 1 week 1
Figure 8: My finished eyes

Once the eyes are merged into the penguin model file, they were resized and positioned on the penguin model (see Figure 9).
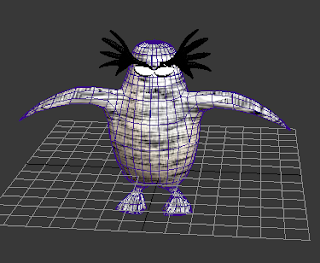
Figure 9: Eyes positioned onto the penguin model

I changed the colour of the eyelids to black to fit in with the penguin theme and I changed the material on the eyeballs as they were not representative of a villain character as they were too plain and cartoon like. I could not find anything appropriate on the internet, therefore I created my own texture using Adobe Photoshop and applied it using the material editor in 3D Studio Max, along with UVW Map to alline it properly. The image below shows the eyeball material (Figure 10).
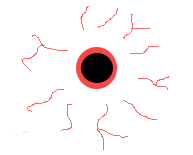
Figure 10: Eyeball material created in Adobe Photoshop
After rotating the eyes as well to make thm look sterner, I took the following screen shot of my penguin in its current state:
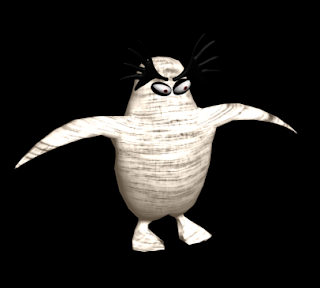
Figure 11: My penguin villain so far with eyes and eyebrows

NOTE: The material used for the penguin body was only temporary and will be referenced at the end of this blog post.

Beak

The beak of my villain started life as a simple box primitive shape which has been split up into 2x2x2 polygons to make it easier to modify and shape.
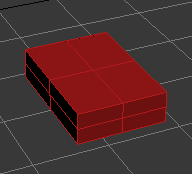
Figure 12: Basic primitive box shape

After converting the box to an editable poly, I selected vertices and moved them so they formed more of a beak appearance.
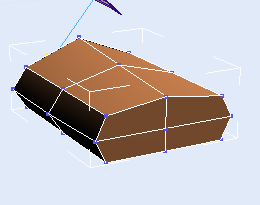
Figure 13: Moving the vertices

The middle vertices were pulled up to form the part of the beak that sits highest up on the penguin's face. The lower part of the beak is pulled down to make it easier to differentiate between the top of the beak and the bottom.
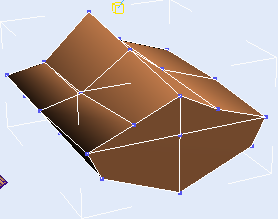
 
Figure 14: The beak is beginning to take more shape

When rearranging vertices, it can be easier to view the model in wireframe mode. In order to give the beak shape, the vertex in the middle of the image shown above (see Figure 15) has been pulled out and the surrounding vertices adjusted slightly.
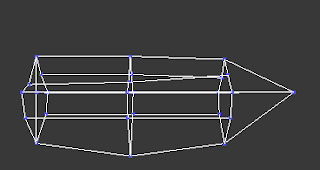
Figure 15: The beak in wireframe view

After alligning the basis of the penguins beak, it was moved into position on the penguin model and the resize tool was used to give the beak more definition, starting with the middle vertices (See Figure 16) and ending with the end vertices (See Figure 17).
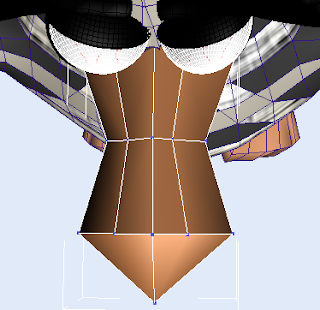
Figure 16: Formation of beak shape

Figure 17: Beak shape accomplished
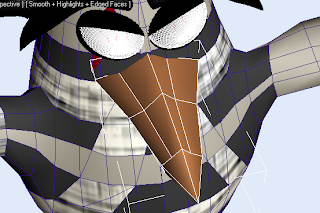
Next, the chamfer tool was used to add more polygons on the beak.
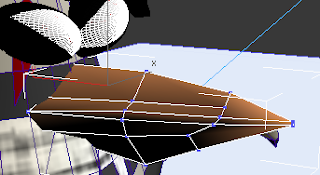
Figure 18: Using the chamfer tool to provide more polygons
The inset tool was used and the new polygons have then been resized to make the beak "open". It also gives the beak a hinge so when I come to animate the penguin's beak, it can be opened and shut. The vertices can also be moved around so if I wanted to have my penguin read a monologue, it can be lip synced fairly easily.
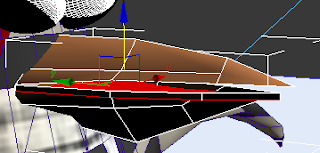
Figure 19: Resizing the new polygons to create a slightly open beak

The final touch was to rotate the beak slightly to give it a more curved and dangerous position. The finished beak is displayed in Figure 20.
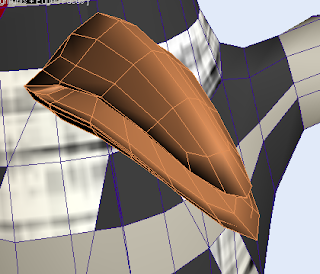
Figure 20: Finished beak structure

Tutorial 5 - Link Constraint

Link constraints make it seemingly possible for a character to interact with other objects and its surroundings. This will be incredibly useful in our final animation. 

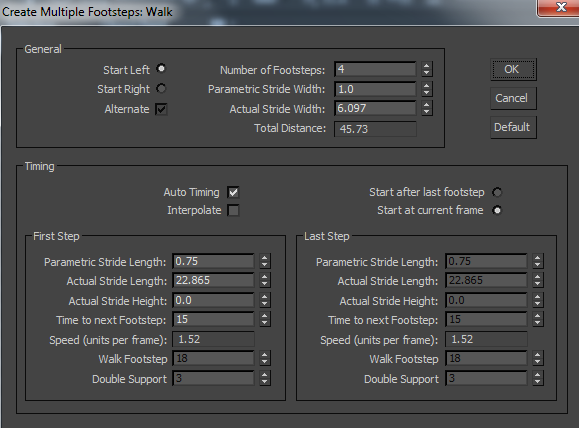
The first step was to create a biped on screen in the perspective viewport. Next, in the motion panel I clicked on Footsteps > Create Multiple Footsteps. Here, you can make many different adjustments, from the number of footsteps, to how big the strides are and how much time inbetween each footstep.


Once I was happy with my settings, I clicked OK and created the keys for the inactive footsteps. Now, when I clicked and dragged the timeline, the biped would walk in the designated footsteps. 


Next, I created a sphere in front of my character. I highlighted the sphere and clicked Animation > Constraints > Link Constraint.  This made a dotted line appear which I then connected to one of my biped's feet.


In the motion panel, a box appeared stating that the foot has been entered as frame 0. However, we do not want the ball to move initially when the animation starts so I linked the ball to the World at frame 0 using the "Link To World" button. 

Next, with Auto Key turned on, I moved the ball to where my character will first kick it (so just before the foot touches the ball).

I then clicked on "Add link" and selected the foot that will kick the ball. If you want it to appear that the character is dribbling the ball, move the time slider to a position where the other foot will kick the ball and again click on ‘Add Link’ and click the opposite foot.