http://www.youtube.com/watch?v=j5LjZDDtex0
This is very handy because the material can be edited in order to make the passive characters in the animation as well as the villain. The villain will be a basic penguin shape with other body parts (e.g. eyebrows) imported into it.
Step 1: Create a hemisphere (select sphere primitive shape and increase the hemisphere option to 0.5) and increase the number of segments to 14.

Step 2: Convert the hemisphere into an editable poly and pull the vertices up in order to create a shape like in the image below. This will form the base of the penguin.

Step 3: Pull the vertices downwards at the bottom of the penguin body and pull them inwards. This is where the penguins feet will eventually end up.


Step 5: In order to remove the point at the top of the head, I used the bevel tool. I also refined some of the vertices to prepare it for the creation of the flippers.
Step 6: In order to create the flippers, I used the inset tool (which is a new skill that I have not used before) in order to place more polygons inside the main polygon that I selected. The image below shows this:

Step 7: I want my penguin model to be symmetrical. This means that when I create the flippers, they will be the same on either side. In order to do this, I carefully selected and deleted half of the model and then used the symmetry modifier. However, I will want to animate both sides independantly form each other later on in the project so I will ask my teacher how to do this.

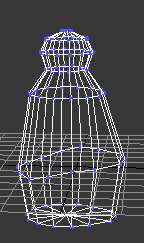
Step 8: Once the symmetry modifier has been applied, the model has to be "pulled out". There are options available to ensure that the model is being reflected in the correct axis and to weld the middle vertices so that they join together. The image below shows the wireframe for my penguin so far:

Step 9: The middle polygon created by using the inset tool will need to be scaled, rotated and modified in order to make it suitable for positioning the flippers. The image below shows me doing this:

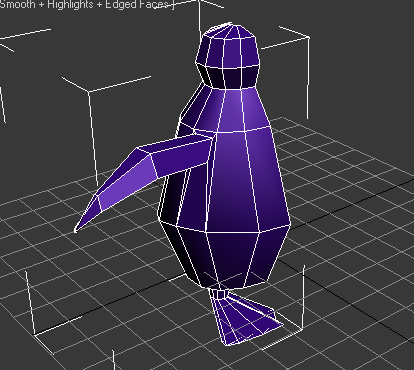
Step 10: The bevel and extrude tools are used in order to create the flippers. I made sure that they had three separate segments in them so that when I come to bone my character, I can promote more natural movement.

After speaking to my teacher, I discovered that using the symmetry tool, I had created an incidence of my model inside of a copy. An incidence is no good becsuse it mans that whatever you make on one side will be duplicated identically on the other side. After playing around with some of 3D Studio Max Tools (see image below), I discovered that the mirror tool was more beneficial.

However, at this stage, it is not necessary to use the mirror tool so early as I want to complete the rest of my components first, such as the legs and feet.
Step 11: The bevel and extrude tools are also used in order to create the legs and feet, in a similar sort of fashion to the flippers. The image below shows the leg:

The image below shows the foot which was extended and then enlarged using the resize tool:
Step 12: Refining. Now that I have a basic shape, I can now just refine what I have already done. The main problem with the flippers is that they are too thin. Therefore in order to rectify this, I moved some of the vertices out and enlarged some of the polygons. I was also unhappy with how far the vertices come in at the neck so I moved them out to form more of a smooth line.

Step 13: This is now the time to use the mirror tool:

The image below shows my finished penguin mesh with the TurboSmooth modifier on. This is just to see what the final body will look like, without the features at this current stage.

On further observation, there was a hole in the top of my penguin's head. In order to rectify this, I made the vertices along each side of the head planar:

Then, I attached the two parts of the penguin so I can edit both at the same time and used Target Weld to weld the vertices together and remove the hole:

The next stage will be to create the facial features (such as the eyes and the beak) and will be documented in future blog posts.
Coming along nicely!
ReplyDelete