The images below display some examples of the CAT Parent Objects that I have available to me:
 |
| Figure 1: Alien CAT Parent |
 |
| Figure 2: Angel CAT Parent |
 |
| Figure 3: Centipede CAT Parent |
 | |
| Figure 4: Crab CAT Parent |
 |
| Figure 5: Mech CAT Parent |
 |
| Figure 6: Panther CAT Parent |
Upon looking at the CAT Parents above, I believe that the angel would be most suitable for me to use in the context of my penguin model because once I have made the necessary adjustments, I would be able to fully animate the penguins wings, plus there is an adjustable tail. However, there is also an option which allows you to create your own bones.
For the purposes of this tutorial, I created my own bones to fit my human mesh:

Firstly, I created a CAT Parent and placed the symbol underneath my model. Next, I clicked on "Create Pelvis". The pelvis acts as the hub for the whole biped therefore it is extremely important to ensure that it has been placed correctly inside the mesh, otherwise the other bones will not match up. Once that has been done, there are options which allow you to add various body parts, such as arms, legs and spines. As you can see from the image below, bones will have to be placed in every part of the model that you wish to move. However, leaving it as it is, the model will not move very realistically once it has been skinned.

In the next step, I had to increase the width and depth of all the bones to make it fit the mesh better. However, care still had to be taken to ensure that the bones stayed as much in the mesh as possible. It does not matter if it overlaps slightly because once the mesh has been rendered properly, the bones will not render.

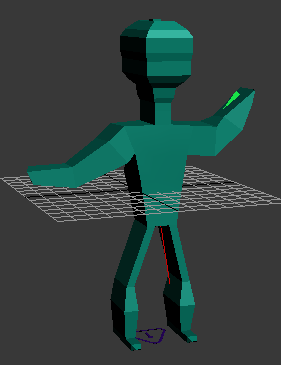
The bones then had to be "attached" to the mesh so with the mesh selected, I clicked on the skin modifier and added all of the skeletal bones to the list and edited the envelops to allow smoother movement. Once this had been done, it means that when the bones are moved, the mesh moves along with the bones, to create different poses and positions which are suitable for animation purposes. The image below shows that I have repositioned my mesh using the bones:

The image below shows the mesh in its new position:
When it comes to creating the villain model, I will have to concentrate a lot on the facial features, along with the penguin's beak to ensure that it will be able to move, as if the character is talking so I will be able to include a voice over and lip sync.
A good first attempt - it is not as easy as it seems!
ReplyDeleteIt really isn't easy I have a feeling this will be one of the hardest parts to this module for me
ReplyDelete